Friday 19 May 2017

Maya Tutorials: Jet Pack Jones Progress

Fig 1: Jetpack Jones' Head Model

Fig 2: Jetpack Jones' Body Model
To be honest I have had a hard time working up the patience to get this model done, I could say that I had other things going on in my personal life and with the other projects but I left Jetpack Jones to gather dust this past year. However as I was modelling Ludlow, I felt more positive about modelling characters in general but it was too late. I want to restart the model from the ground up over summer to gain the skills of learning how to rig with the ribbon spine and so that I am more in tune with modelling in general come third year.

Acting Lesson 3- 29/3/2016 Status


Fig 1: Lewis and Deanna going to the movies


Fig 2: Mark and Hannah as Guest and Waitress
So this week we dabbled in Status and how that effects body language. We did this first by doing an exercise where we would pick a card from ace to ten with ace being the low status and ten being the high. We were then asked to come into the room, sit in a chair and say our name, the manner of which we did that depending on the card we got. So people who got 5 and below acted more nervous and skittishly then people who got above 5 who acted confident and proud. Status isn't just an acting mechanic, its based on what happens in real life, but playing around with who has the higher status is a very interesting twist. A waitress getting the upper hand on her customer or a boss being push around by his employees. Status can lead to very interesting character dynamics just by switching up something generic into a more unique and funnier situation.

Mental Ray Part 5: Portal Lights

Fig 1: Before Portal Light

Fig 2: After Portal light
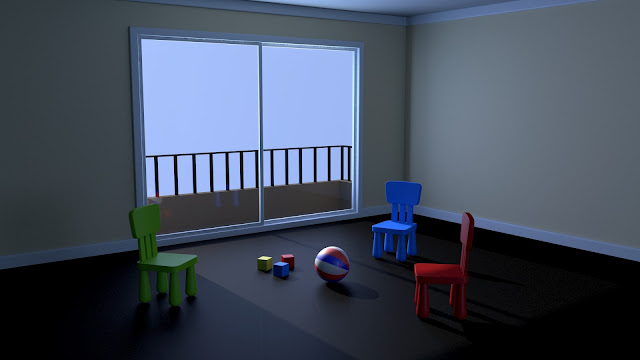
For this tutorial I had some issues with the physical sun and sky system when rendering however apart from that I was able to enable the portal light to light up the scene through final gather. I might go back in to play around with the samples a bit more for the shadows on the walls and increase the intensity of sun coming through the window, brightening up the scene a bit more.

Mental Ray 6: Mia Material X Shader

Fig 1: Balls without the Mia Material X Shader

Fig 2: Balls with the Mia Material X Shader
This tutorial helped in showcasing what the Mia Material X Shader can do. I was able to grasp this tutorial straight away with the only issue I had being my computer not being able to handle the duplications of the node so I had to copy them one by one, but the results of each of the presents are very interesting.

Acting Lesson 1-15/3/2017


Fig 1: Becky, Danielle and Toms First Scene
Fig 2: Becky, Danielle and Tom's Second Scene


Fig 3: Becky, Danielle and Tom's Final Scene


Fig 4: Almu, Aureo and Lewis' First Scene

Fig 5: Almu, Aureo and Lewis' Second Scene

Fig 6: Almu, Aureo and Lewis' Final Scene

For our first acting lesson we began with imagining one enough as clay ready to be moulded, this was to creative dynamic shapes that suited with the characters we were trying to convey, like lion tamer and harpist. Being about to show a characters personality through there pose alone is very useful in terms of animation as you can show the audience what your character is straight away. The final project after break was to develop a 3 piece storyline only through 3 sets of poses, they had to be clear, well thought out and presented with staging in mind. This, in my opinion, helped in not only using poses to get a message across but also helped in imagining staging when animating in Maya.

Thursday 18 May 2017

Global Animated Film Review: Israel- Waltz with Bashir

Fig 1: Waltz with Bashir Theatrical Poster

Waltz with Bashir is a 2008 Israeli animated documentary film, written and directed by Ari Folman. The film is from a personal experience of Folman who is trying to recover his lost memories of when he was a 19 year old soldier in 1983 during the Lebanon War. It features many other ex-soldiers who worked with Folman and gives their accounts of what happened in the war. The film was nominated for multiple awards included the Golden Globes and BAFTAS for Best Animation and Best Foreign Language Film, Waltz with Bashir also has a predominately positive rating from film critics and was in the top ten films of 2008 in multiple film critics lists including Ella Taylor in L.A. Weekly and Lisa Schwarzbaum from Entertainment weekly. The film is permanently banned in Lebanon due to the film depicting a time in the countries history that was brutally violent and devastating, however there has been protests to allow the film to have limited screenings across the country.

Fig: Dogs in Folman's dreams


Detailing the events of the Lebanon War, war veteran and the director of the film, Ari Folman, experiences recurring nightmares of dogs chasing him. He reaches out to his friend from the war and the two make the connection that there might be a connection between the nightmares Folman experiences to an early part of the Lebanon War. However due to the fact that Folman cannot recollect that period of his life, he goes out of his way to meet other war veterans to understand the effects that unfolded during the war. Throughout the film, he dreams of the Sabra and Shatila Massacre and through the help of numerous accounts of the events from the other veterans, and the Journalist, Ron Ben-Yishai, Ari is able to recover the lost memories of the gruesome events that took place in 1982.

Fig 2: War is the norm


The film took four years to make and is strange for a documentary as it is almost completely animated. Despite its appearance the film was made with 3D assets and Adobe Flash using cutouts, where each image was broken up into a number of pieces to allow for movement, instead of rotoscoping, where the animation is drawn over a live action piece of footage. The art style for the film was directed by David Polensky with the animation being directed by Yoni Goodman and features scenes drawn by various artists. The use parodied 1980's music to tell the events in Lebanon reflects the decade and tells the viewers of what happened without having to go through in detail exposition by having a familiar catchy tune. Despite the majority of the film being rendered in this animation style, the ending of the film shows real life footage of the aftermath of the massacre and Folman finally remembers the events leading up to the travesty that took place in 1982. This change from animation to live action lays down the fact that these events actually happened and aren't fictional in shocking detail.

Fig 3: Surreal moment of a Giant Woman climbing aboard ship


Overall the film details the events of the Sabre and Shatila Massacre, giving context to the Lebanon War and the lead up to the massacre. It does this through a compelling journey follow Folman trying to remember what happened. There is no sugarcoating, the film gives grim details of war and its effects on the soldiers who go to fight for their country. The veterans featured all have their fair share of psychological issues because of what happened in the war. The use of animation allowed for surreal moments and illustrate events in the Lebanon war through parody songs and exaggeration.

Fig 4: Folman's recurring dream of walking up shore to Lebanon


Animation in Israel in the year 1961, with the film Joseph and the Dreamer directed by Yoram Gross, but it is not a prominent method of film making in the country. Early Israeli productions were stop-motion animations with plasticine models, while more modern 2D animations use various 2D methods using flash and and some 3d animations are used too, as present in Waltz with Bashir. While Waltz with Bashir is probably the most well known animated film to come from Israel due to its plot revolving the countries recent history in such a thought provoking manner, the country also produced other films, both collaborating with other countries like France and Australia. One example, $9.99, an Australian film written and directed by Taiti Rosenthal with its screenplay by Etgar Keret, both Israelis.


Bibliography

Fig 1: https://upload.wikimedia.org/wikipedia/en/9/9f/Waltz_with_Bashir_Poster.jpg

Fig 2: https://i1.wp.com/whiggles.landofwhimsy.com/hdcaptures/bashir1.jpg

Fig 3:https://s-media-cache-ak0.pinimg.com/originals/ae/50/84/ae5084cb4cb81ceb4cb1227734babe8c.jpg

Fig 4: https://blogger.googleusercontent.com/img/b/R29vZ2xl/AVvXsEh8dsKOfzIaIimFglzLJP5nSGALsiHXZugtRqepz8R_HsYUIPL5lsj82Qxon48X05gwcgInEkTCBbNqzjJsLlsN2MSBDOYxQ0ufLjJOxZ2xTdXCP4h____hqsI5s8x4sGSwei0n1F_z1Q/s1600/Waltz+with+Bashir+(4).jpg

Mental Ray 2: Final Gather

Fig 1: Original Render
Fig 2: No Maya Light Present
Fig 3: Initial Final Gather
Fig 4: Final Gather with Minimal Settings for Accuracy and Point
Fig 5: Final Gather with Accuracy at 100

Fig 6: Map Visualiser Enabled
Fig 7: Added Directional Light
Fig 8: Material X Glow Node Added
This Tutorial went over the Final Gathering method in Mental Ray. It was quite an easy tutorial to understand and is a better way to produce more realistic lighting due to Final Gathering offering a Global Illumination to the object, enhancing it. The only big issue I had with this tutorial was getting the diagnose final gather option to work on the render viewer but the map visualiser worked so it seems like a slight issue that I can work around. Making Material_X into a glow node was a very simple process to turn the model into something that looks like Tron with its neon highlights. overall it was interesting to see the effects of the Final Gather and of its usefulness as well.

Mental Ray 1: Samples and Quality Control

Fig 1: Initial Maya Render
Fig 2: Initial Maya Light Render
Fig 3: Maya Area Light Render
Fig 4: Initial Maya Shadows
Fig 5: Maya Shadow Map Render
Fig 6: Initial Ambient Occlusion
Fig 7: Ambient Occlusion at 64
Fig 8: Ambient Occlusion at 128
Fig 9:29 Second Render with Diffuse Shadows

This tutorial was quite easy to grasp, samples allow for cleaner render that is both in high quality and fast render speeds. Initially my renders for the scene where quite fast, the longest being around 3 minutes compared to the tutorials 4 minutes. I managed to bring down the render speed to 29 seconds using the diffuse shadows but when I switched to raytracing the graininess of the shadows could not be soften back down and that was my only issue.

Fig 10: Ray Tracing Shadows Retained the Graininess no matter the value I set it to


Thursday 11 May 2017

Adaptation B: Reflective Statement

As a result of the final crit for Adaptation B, I feel like I have received reasonable feedback regarding both my work ethic for this project and the quality of Ludlow's final model. I have known for some time that I need to change my process for working and how I go about it. I need to start producing work at a constant rate and publish what I do regularly. As well as this I also need to stop putting things on the back burner and I need to work faster in order to have extra time to deal with any issues or feedback given by members of staff and peers on the course. I know that I have the talent to create characters but my attitude towards work affects my abilities to perform well on various projects. I need to be proud of my skillset and apply it to my work instead of shying away because I feel like I lack the ability to do it.

This behaviour of "Oh I'll do that tomorrow/next week/next month" needs to stop, it won't getting me any closer to doing what i want to do on the course and out of the course if i continue this train of thought. I discovered late in the project, that the progress I was making increase when I did work on campus and setting up a space at home that was quiet and didn't have any distractions. This helped me in not losing focus and by keeping that time managed with strict break schedules to avoid procrastination. As well as that, I feel like I was more willing to ask for help when I needed it, asking tutors and other students as well as trying to figure problems out on my own. I feel more confident in asking for help when I need it, something that for years I've struggled with as well as showing work in general, which I still need to work on.

Wednesday 10 May 2017

Adaptation B: The Black Book of Secrets Presentation


Adaptation B:Texturing and Rigging


Fig 1: Ludlow's Head with UV mapping 

Fig 2: Ludlow's Body with UV Mapping

Fig 3: Ludlow textured without his scarf

Fig 4: Ludlow textured with his scarf

Fig 5: Ludlows Rig

There have been so many ups and downs modelling Ludlow, while UVing went quite well, Rigging (especially Weighting the model to the rig) had been an absolute nightmare, it was mostly on my part however forgetting some parts and trying to figure out what to do with the scarf - as I wanted it to be that while the scarf was connected to the rest of the model it wasn't weighted at all - was tough. After six tries and most of the day gone I finally weighted the model to an ok standard, it does its job which is all I can ask for after spending so long on it.
Maya on my home computers in general are very picky with me, one won't allow me to install mental ray and the other one throws a fit over batch rendering to the point that it closes the program down altogether. I'd have to restart the program again on both macs to see is resetting back to default can help in some way.

Saturday 6 May 2017

Adaptation B: Ludlow Colour Composition

Fig 1: Ludlow Colour Comps
Here are some colour compositions for Ludlow, keeping with the description presented in the book I kept his shirt grey. Also I wanted the gloves and scarf to be a different colour scheme to the rest of his clothing due to the fact that they were stolen and originally belonged to a rich man so i implemented richer colours to show that.

Thursday 4 May 2017

Adaptation B: Modelling Process

Fig 1: Ludlow's Head

Fig 2: Ludlow's Body
I am almost at the stage where all of the pieces have been modelled now apart from ludlow's stolen scarf and his hair. Some aspects of his face had to be changed to suit 3D for example his eyes as I had to divert from the orthograph to allow the model to have eyelids. I might also need to go in with the relax tool again in certain areas and fiddle with the eyebrows some more so that they fit with the head better.