Post-Viz Mr Plimsolls from Katie Lima on Vimeo.

Tuesday, 4 June 2019
Friday, 3 May 2019
Major Project: Bathroom Animation Scenes
Some of the scenes for the Bathroom part of my film describing the fate of Mr Plimsoll's wife. There is some issues with the textures and the lighting in the bathroom set that need a go over to make sharper and less noticeable, to achieve a watercolour aesthetic showed in the backgrounds in 1930s cartoons. I also need to add a spotlight effect to the axe and fridge scenes so that it reflects what is shown in the animatic more faithfully.
Sunday, 7 April 2019
Major Project: Mr Plimsoll- Facial Rigging
 |
| Fig 1: Mr Plimsoll's Facial Controls |
 |
| Fig 2: Side Profile of Mr Plimsoll and his Facial Controls |
 |
| Fig 3: Mr Plimsoll's Eye Blink |
 |
| Fig 4: Mr Plimsoll's Mouth Open and Tongue Out |
The facial rigging on Mr Plimsoll's is at a good stage, his mouth is able to open and close and there is quite a good range of expression there. the only thing that I would say is an issue would be the a modelling issue where I think that his mouth is a little bit too large, in a way that when pulling the controls in the corners of his mouth, they do distort a little bit and pulling the mouth controls into a tight expression like a 'shh' is a little hard to do because of the larger mouth.
I added an extra control in the nose to allow for additional movement in that area for when he walks and the blink, while taking me three tries due to simple mistakes I did with the blend shapes, works just fine.
Overall I am quite happy with how the facial rig has turned out, I might have to do some finessing in the mouth area to make sure that the skinning on the joints in the blend shapes are blended smoothly, but in general Mr Plimsoll is able to do what I want him to do now.
Thursday, 28 March 2019
Major Project: Concept Art for Props and House Variations for Road Set
 |
| Fig 1: Variations of Houses for the Road set |
 |
| Fig 2: Designs for Mr Plimsoll's Bag |
 |
| Fig 3: Concepts for the Photo above the Fireplace in Mr Plimsoll's Living room |
The House variations are just to give the background of the road set a bit of character as Mr Plimsolls walks by. The houses are similar but the differences are in the features of them, and my plan is to take 3-4 of the designs to use for that set.
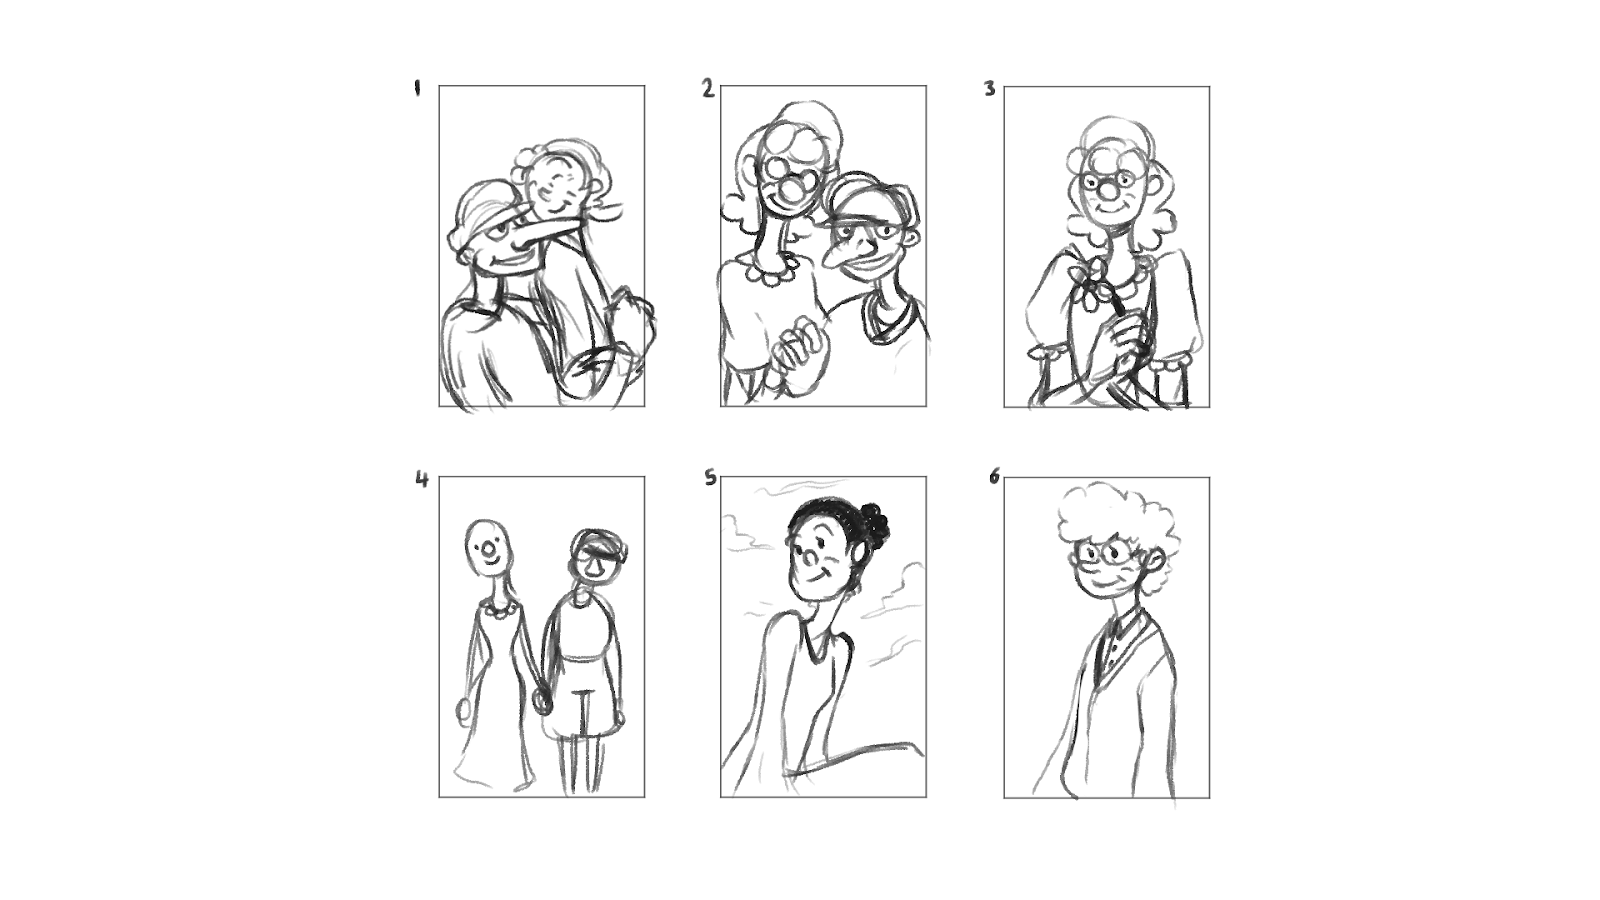
For Mr Plimsolls' wife I wanted to go for a character design that was quite hidden in terms of who she is, but for her to be portrayed as a positive person in Mr Plimsolls' life so having her also smile but be smiling in a way that is opposite to Mr Plimsolls, instead of being creepy, her smile is more genuine.
Major Project: Mr Plimsolls- Finessing the Skinning on Limbs and Pose Space Deformers
 |
| Fig 1: Example of Pose Space Deformer working in Shoulder and Knee of Mr Plimsolls |
 |
| Fig 2: Skinning in arm following Ribbon Spines used for the Rubber Hose Rig Example 1 |
 |
| Fig 3: Skinning in arm following Ribbon Spines used for the Rubber Hose Rig Example 2 |
 |
| Fig 4: Elbow is still able to bend naturally despite the influence from the Rubber Hose Rig |
After I was at a point where I was happy with how the model bent, I put Mr Plimsolls into a couple of poses only to see that the arms weren't flowing correctly in an arc when the elbow control and the flex controls are pull out together. So I went back into the Paint Skin Weights Tool to update the weights in the arm to allow fluid motion both when the controls are pulled separately and when they are moved together as well.
Friday, 22 March 2019
Major Project: 3D Environment- Mr Plimsoll's Bungalow Progress so far
 |
| Fig 1: Mr Plimsolls Bungalow |
 |
| Fig 2: Close up on Roof |
 |
| Fig 3: Close up on Fence and Gate |
 |
| Fig 4: Model of Tree used in the Foreground |
Here is the process of Mr Plimsoll's Bungalow at the moment, I still need to add the overgrown nature of the house, ivy on the roof and on the house, and the overgrown bushes that cover the front of the house. There is still some modifications that need doing on the gate panels and the windows still need developing.
Despite this I'm pretty happy with the progress so far with this scene, even if its still in the developing phase and in need of some refining.
Major Project: Environment Concept Art 02
 |
| Fig 1: The Road Mr Plimsoll's lives on |
 |
| Fig 2: Mr Plimsoll's Living Room |
Mr Plimsoll's living room was design with the idea that Mr Plimsoll's was just a man who went through the trauma of losing his wife. To show that he reminisces the time he spent with his wife, I had the idea of the room having many picture frames with pictures of them as a couple. The run down aspect is more due to the fact that because of his old age he wasn't able to keep up with the house keeping. As well as preferring to spend the majority of his time outside of his house, wandering around the town instead of staying indoors wallowing in loneliness.
Sunday, 3 March 2019
Major Project: Mr Plimsolls Model Progress- Rigging and Skinning
 |
| Fig 1: Mr Plimsolls' Rig |
 |
| Fig 2: Mr Plimsolls' Skinning |
 |
| Fig 3: Example of the "Rubberhose" Rig working on skinned Mr Plimsolls 01 |
 |
| Fig 4: Example of the "Rubberhose" Rig working on Skinned Mr Plimsolls 02 |
I came to the conclusion that it was due to the way that the arms were originally positioned, they were slightly sloping downwards instead of being in a strict T-pose. Just to experiment I made some standard three joint arm rigs and applied IK handles to them to find out that the reason why rotations would jump on the joints happened due to the joint placement being incorrect.
To combat this I made some slight changes to the model's geometry by straightening out the arms and placing the joints in a straighter position making sure to make the only rotations made were in the joint rotations and not the world rotation. While this helped with the IK Handle issue I had slight complications with the Pole Vectors still, However after carefully following one of Alan's rigging tutorials for Jetpack Jones I was able to get it working properly.
I had a few issues with setting up the "Rubberhose" rig too, the issues mainly involving the connections and the constraints with the ribbon spines and another issue of them causing weird rotations to happen to the joints. However after fiddling with the rig, and redo the ribbon spines more times then I can count, I was able to fix the rig so that there are no sudden rotations in the joints and the controls work with the ribbon spine without that much of an issue
Overall while rigging Mr Plimsolls as been a somewhat difficult and way more convoluted then I originally thought, I'm quite happy with the progress if made with him so far, even if the issues I've had with him as pushed me back time-wise then what I would of liked.
Wednesday, 27 February 2019
Major Project: Environment Concept Art 01
 |
| Fig 1: The Front of Mr Plimsoll's House |
 |
| Fig 2: View of the Churchyard from Mr Plimsoll |
 |
| Fig 3: Mr Plimsoll's Bathroom |
Overall while I like the process I'm making with these environment designs and they are able to convey the scenes clearly, I feel as though I can push the creepy, overgrown nature of Mr Plimsoll's house further.
Tuesday, 22 January 2019
Life Drawing: Monday 14th January
 |
| Fig 1: |
 |
| Fig 2: |
 |
| Fig 3: Sectional study using 4 different colouring pencils |
 |
| Fig 4: Study using 3 differing coloured pencils |
 |
| Fig 5: 20 Minute study using 3 colouring pencils |
 |
| Fig 6: 20 Minute study using 4 colour pencils for the body and additional 2 for the cloth |
Overall I feel as though this life drawing session really gave me a good feel of using pencils and I can really see the difference of the earlier pieces to the later ones as i got more used to and more accustom to the medium.
Wednesday, 16 January 2019
Minor Project: Reflective Statement
My overall opinion of my progress through the minor project this year was of a general sense of achievement in comparison to the work I had done the year previous. While I wasn’t able to finish all of the things I wanted to complete before the deadline I am glad that I now have a coherent story for my film and have a visual representation of what I want my film to be through storyboards and my animatic, as before I was stuck with just an idea and unfinished character models.
One con that I have involving my work ethic was that I let time slip leading me to be behind on goals I had on my schedule. This lead me to not give things like rigging and skinning the time they needed to be finished before deadline. Especially with the type of rig I had to do for Mr Plimsolls I wish that I was able to have time during the Minor Project to have finished the rig and skinning, instead of having to bring it forward into the Major.
A pro I have with my project so far is that I feel like my understanding of Maya, such as working in the node editor, as increased because of the rubber hose rig I’ve used on my character. While I’ve asked for help in the process of making the rig I was then able to take the advice onward to help when I came across similar issues in other areas of the rig.
Going forward into the Major Project now, one of the goals I want to have going forward is making and sticking to daily goals set and to come into the uni more often with the mindset of work and asking for help and support when needed.
Friday, 11 January 2019

Sunday, 6 January 2019
Minor Project- Mr Plimsolls: Animatic
Mr Plimsolls- Animatic from Katie Lima on Vimeo.
Here is the Animatic for my film about Mr Plimsolls. After looking at the feedback I got for the storyboards I made slight changes to them before sorting them out into the animatic. I realised that I would need some additional scenes as I was applying the frames to the audio as the timings between the two weren't matching up to my liking. I tried to keep the sets and backgrounds limited for the film and I also wanted to try out so effects in 2D in some of the scenes, like with the churchyard scene. Overall, doing the animatic as now given me a stronger idea of how the film will turn out, now that there is visuals to go with the audio.
Here is the Animatic for my film about Mr Plimsolls. After looking at the feedback I got for the storyboards I made slight changes to them before sorting them out into the animatic. I realised that I would need some additional scenes as I was applying the frames to the audio as the timings between the two weren't matching up to my liking. I tried to keep the sets and backgrounds limited for the film and I also wanted to try out so effects in 2D in some of the scenes, like with the churchyard scene. Overall, doing the animatic as now given me a stronger idea of how the film will turn out, now that there is visuals to go with the audio.
Subscribe to:
Posts (Atom)